Showing posts with label cuttlebug. Show all posts

Tuesday, July 16, 2013

Summer Card Camp 2--"New Baby"

Hi everyone!

I hope everyone had a great weekend! I'm here to share a card I made for the Summer Card Camp 2 class. We were given a new color combo as well as new sketches so I wanted to play along. Here's my card:

This is my first shaped card! And it was super easy to make!!! I used brown cardstock for the base and then cut several circles (Spellbinders). The pattern paper is from a friend so I don't know who made it but the onesie is from Wplus9. The white circle was also embossed with the Swiss Dots folder for some added texture to the card. I wanted to add a lot of faux stitching, too, so I added it to the onesie, the card base circle and the sentiment (Hampton Arts). It was actually pretty quick to make the card and I might just make some more like this to have on hand.

Thanks for stopping by!
Pat

Wednesday, July 10, 2013

Hello World card

Hi everyone!

Popping in to share a card I made a few days ago for a friend that welcomed a baby girl to her family. Baby cards are always so much fun! :) I'll be entering this card in the "Anything Goes" challenge at the Word Art Wednesday site. Here's my card:
This card was super quick to make and I love how it turned out! I used the Swiss Dots embossing folder to emboss the card front. Then, I die cut the onesie from Wplus9. The pattern paper is actually from a Christmas pack but it's so cute! The sentiment is from Inkadinkadoo and I layered that on the pattern paper, too. Then I die cut the eyelet circle from Spellbinders. I added a few pearls to the onesie and added some faux stitching to the onesie and the card was done. Easy--yet cute! :)


Have a great Wednesday everyone!
Pat

Thursday, May 30, 2013

Unscripted Sketches time

Hi AGAIN!

Yes, 3 times in one day! I haven't played this much in my room for a VERY LONG time! I'll probably drown in work tomorrow but that's ok. It was TOTALLY worth it! :)

Now, I'm popping in to share a card I made for the Unscripted Sketches site. They had a fun sketch that I wanted to play with. Here's my card and the sketch.


With Father's Day right around the corner, I figured I'd start working on some cards. I used some pattern paper (sorry, it's from a friend's stash so I don't know who designed the paper) and then I used some chipboard. Truth be told, I started out as a scrapbooker and I really need to use some of my scrapbooking supplies! When I stumbled upon my chipboard, I knew it would be perfect! I inked the bracket and the letters with vintage photo distress ink and then I embossed the bracket with my swiss dots cuttlebug folder. I adhered that main panel on some blue cardstock and then put it on the card base and the card was done! It's a great card to mass produce, too!

Thanks for stopping by and have a great weekend!
Pat

Tuesday, May 28, 2013

Thinking of You

Hello everyone!

I'm popping in to share a card I made for a young lady who is struggling right now. Her name is Maddy and if you follow Simon Says Stamp! you probably already heard about her situation. Life isn't fair sometimes. But, we can all help each other through the hard times by encouraging one another and praying for each other. I'm also entering the card into a couple of different challenges in the hopes that more people come by the blog and also make cards for Maddy. First up is the Lawnscaping site that has a CAS challenge. Although the clean and simple look appears easy, it's actually not and I struggle with wanting to put more on the card when I participate in these types of challenges. The second challenge is from the Word Art Wednesday site. The challenge is "anything goes" but it also wants us to add an encouraging word. So, although the sentiment on my card is simply "thinking of you" it is an encouraging one for someone who is going through such a hard time. Below you'll find my card and the challenge badge.

I started out by using a VERY old square punch from Creative Memories to make those 3 windows. I then used a Flourish embossing folder from Cuttlebug and used my scoring board to add a couple of lines in between the embossed area and the windows. I punched out some butterflies (Martha Stewart) and then added some pearls to the center. Then, I stamped the sentiment (Teresa Collins, I believe) and heat embossed it. I layered the front of the card to some dark navy cardstock so that the butterflies would stand out a bit and then the card was done. Pretty easy...but hoping it brings a smile to Maddy's face. Please, if you have a bit of extra time, consider making a card for her. You can send cards to this address:

St. Jude Children's Research Hospital
Maddy Justice-Patient
262 Danny Thomas Place
Attention Mail Stop 108
Memphis, TN 38105

Hope everyone had a wonderful long weekend! See you soon!
Pat

Thursday, May 2, 2013

A Mother's Day card

Hi again!

Here to share another card I made tonight for Mother's Day. If you head over to V's Sweet Ideas, you'll see this is the latest challenge over there and with Mother's Day right around the corner--it's a perfect time to play along! Also, there's a color challenge at Inkspirational AND A Blog Named Hero challenged us to use glitter, bling, etc on our card. That's right--three challenges in one! :) You'll find my card and the challenge badges below:

Let me begin by saying that, for those that have been seeing my cards these past couple of weeks, yes, I am using a lot of embossed cards right now. I took my cuttlebug on vacation with me and embossed tons of cardstock so that I could come back and finish the cards any way I wanted. And I still have a lot of embossed cardstock so don't be surprised if you keep seeing different variations for the next few months! :) Although, truth be told, it's a great way to get some prep work done beforehand.

Now, for this particular card I used shaded lilac distress ink and added some dusty concord to the edges of the sentiment, too. The color is a very soft purple color. I wanted to use a darker purple for the butterfly and used a Martha Stewart punch for the butterfly and added some bling to it. I also added some gems to the center of the flowers and also used my glitter pen on the smaller flowers. It's hard to see in the picture but you can see it a bit on the flowers towards the top of the card. Looks really nice in life real. I also wanted the butterfly to appear as if it was on a fence so I used the Hero Arts Lattice stamp and placed that behind the butterfly. I added some ribbon, the sentiment, some stitching and we were done.

Thanks for stopping by!
Pat

A runway-inspired baby card

Hi friends!

I'm so excited to share a card I made late last night with you. It's for the Runway Inspired site and it challenged us to be inspired by a photo and make a baby card. Here's the photo and my card:

I had been looking for a baby stamp set for a long time! And last week I stopped by Michaels and they had just put this Inkadinkadoo stamp set on clearance...$3.99 and no sales tax! I was thrilled! I was dying to use it so when I saw the challenge for the week, I jumped at it! I wanted to use my swiss dots embossing folder to mirror the dots the little girl had on her dress. And the grey/black she's wearing is on the card base and the insert behind the main image. I added a ribbon that says "it's a girl" and used the stamps from the "welcome baby" set. I colored in the cute little dog with my inktense pencils. They didn't have a really light pink so I just kept watering down the color I had and it worked! I added a few gems and the card was done. Such a fun card!

Thanks for stopping by!
Pat

Wednesday, April 24, 2013

Color time!

Hi friends!

It's been a busy week but I'm here to share a card that I worked on over several days and finally completed this morning. I'm entering it in two different challenges. The first is Simon Says Stamp and Show where the challenge is to use color on your cards. And lastly, Simon Says Stamp's blog that has an "anything goes" challenge. LOVE those! :) Here's the sketch and my card:


I used the Cuttlebug Embossing Plus folder called Perfect Perennials and then inked the embossed areas using Salty Ocean distress ink. Love that vibrant blue color! I also added a few gems to the centers of the flowers to give them a bit more dimension. Then, I took some strips of cardstock and inked those with the salty ocean color also. The butterfly is from Stampin' Up and I used my inktense watercolor pencils to color in the wings. I then added some glossy accents to those and love the look of it! I then realized I had forgotten to color in the butterfly's body so I used my vintage photo distress marker and used it as a watercolor to color in the body. I free handed the antennae and the swirly flight pattern. Then, I added some orange stickles next to one strip of the blue paper and added some dots of orange around the butterfly. I really like that color combination and the pop of orange was perfect! For the sentiment, I inked up some white cardstock with the same distress ink and then heat set it. After it was dry, I used versamark for the greeting and then embossed it. That way, the whole card has colors that match. The card took me several days to complete but mostly because of lack of time--not b/c it's too complicated...

Hope you all can play along and thanks for stopping by!
Pat

Thursday, January 26, 2012

MOJO Monday combo

Hi everyone!

This week has flown by for me and I hope everyone has had a good one...I was able to enjoy some crafting time tonight and finally used some new Hero Arts stamps to complete the MOJO Monday sketch and a local craft store challenge, too.

Here's the sketch from MOJO Monday:
I love the sketch and figured I'd combine the challenge with a cardmaking club challenge. I had to use pink cardstock as the base to my card and include a heart-shaped paper clip, too.


And here's my card:
I knew that I wanted to use red, white, and black as the color scheme. I embossed 2 of the white squares and 2 of the black squares with my cuttlebug. Then, using the XO stamp from Hero Arts, I heat embossed the 2 letters. I used the sentiment from the & set (again, from Hero Arts) and embossed that in silver, too. I added some faux stitching with a silver pen. Using an EK Success Heart punch, I added the big heart to the white square and the smaller heart to the center panel. I had to use the paper clip so I picked the other white square and used glossy accents to adhere it. (That adhesive is amazing--I even used it the other day to fix a broken heel on my shoe!)

I am LOVING the new Hero Arts stamps...So fun to work with new stamps!

Have a great weekend!
Pat

Sunday, January 22, 2012

A card that killed 2 challenges with one stone!

Hi all!

I've been MIA for almost a month! I can't believe it's been that long since I've posted anything...guess these past few weeks have been busier than I thought! But, alas, I got to play today! And maybe the long break helped fuel the fun b/c I enjoyed making the card immensely! :)

For this card, I used two different challenges. I started with the great sketch from the CPS site. It's a clean look and I love that look! Here's the sketch:
And I then combined this challenge with the fun challenge at CAS-ual Fridays. So, I got a great sketch and the "penguin suit" means I can only use black and white...yes--that's right up my alley! LOVE it!


Here's my card:
I started out by embossing a 4.25x5.5 piece of white cardstock using the cuttlebug swirls embossing folder. I cut it into 3rds and then added black ribbon. I used a label from sizzix and stamped the sentiment in black, embossed it, and added a few tiny rhinestones. Easy card to make--but it looks so elegant. Had I not had to stick to only white and black, I think the hearts would've been red or a mix of red and silver but I still like this look.

Thanks for stopping by!
Pat

Tuesday, December 27, 2011

MOJO Monday time!

Hi everyone!

Well, my crafting time continues! I hope all of you are getting a chance to play, too, although I know that this time of year is busy for most...

This was the sketch for this week's Mojo Monday.


And here's my take:
I started out with brown cardstock that I embossed using my cuttlebug and the flourish embossing folder. I added the ribbon and then a line of pearls along the top of the ribbon. I stamped the sentiment and flowers (Hero Arts) and inked the edges of the white cardstock with vintage photo distress ink. Done! :)

Off to catch up on some scrapbooking...that'll be my project for the next few days.

Have a happy and healthy 2012!
Pat

Thursday, December 1, 2011

Skipping Stones design

Hi everyone!

I know--I've been MIA for awhile. Thanksgiving came and went and we had family in town. But, we also had a friend's mom turn very ill over the holiday. And she passed away yesterday so I have been really busy with other issues. In fact, I really had to muster up some creativity to decide to make a couple of cards tonight. It was therapy for me, though...

I wanted to use the latest sketch from Skipping Stones...it looked so fun--and it was! Here's the sketch:


Here's my take on it:

I used kraft-colored cardstock as the base and embossed it using my cuttlebug. Then, to make the embossed area pop a bit more, I added some vintage photo distress ink. I used an old Creative Memories circle cutter to cut a circle out of the main panel and then cut out a smaller circle using my fiskars circle punch. I stamped the flower image and added a rhinestone and then adhered that to the card base. The embossed panel is mounted with dimensional foam all around the card. I stamped the sentiment and cut it into 2 strips and the card was done! I LOVE this sketch b/c I can see myself using it A LOT for different occasions.

Hope you can play along!

Sunday, October 9, 2011

CPS 239 and Lawnscaping 19 Challenge

Hi everyone!

Hope everyone is enjoying their Sunday! I'm actually home alone--which means I get to play in my room! :) My men are off at our church's apple festival and, since I'm recuperating from a pneumonia bout, I'm home resting (and playing a bit, too!).

There's a couple of challenges I had hoped to sink my inky fingers into. The first was a sketch challenge from CPS. Here's the great sketch!


The other challenge had been posted for a bit but I'd been too sick to play along..til today! :) Lawnscaping's challenge was to do some layering/dimension elements on your card. Here's the official pic of the challenge.


The sketch lends itself to some dimension so it was great to incorporate both into my card. Here it is:
I started out with kraft-colored cardstock that I inked up using vintage photo distress ink. I then used 2 strips of KI Memories pattern paper that I cut using an old Creative Memories wave cutter. I punched out 2 circles--one in white and one in teal. The white circle I decided to use the script Cuttlebug embossing folder and add some dimension to the circle. The card kindda reminds me of going to the beach and the script seemed to remind me of writing in the sand. I changed the color of the circle, though, and used shabby shutters distress ink to have it give some more color to the card. When I started assembling the card, I kept thinking the brown background needed something. So, I took my "happy" definition stamp from Hero Arts and stamped it in vintage photo. Just wanted a subtle pattern in the background. I adhered the strips of pattern paper and the circles. But it was missing something...so I grabbed some pearls and that made me happy! :) I used a spellbinders label for the sentiment die cut and then stamped Happy Birthday in vintage photo ink.

LOVED the sketch! Hope you can play along!
Pat

Sunday, October 2, 2011

Wee Memories Challenge 70 and CFC 22

Hi everyone!

I hope everyone had a good time this weekend making some cards! Although, technically, the weekend isn't over but I know many enjoyed World Cardmaking Day yesterday. I was busy almost all day but did make a quick card last night and decided to use these 2 challenges to enhance the fun!

The first challenge was from CAS-ual Fridays. Here's the challenge pic.
I knew I had some ribbon that had some loops on it and I hope this counts! :)


Over on the Wee Memories site, the challenge is basically to do whatever technique is your favorite. That's easy for me--I know it's gonna have some embossing on it! :)

So, here's my card.

It's a smaller card--I think it's 4.25x4.25. I started out with some light blue textured cardstock and embossed it with the swiss dots embossing folder from Cuttlebug. Then, I used my spellbinders label (#8, I think?) to cut out the white panel. I knew it'd be a baby card so I used an old Fiskars texture plate and used that to emboss the little hands and feet on the white panel. Unfortunately, the picture doesn't pick it up much. Then, I took some of the baby blue ribbon w/the baby bib loops and added it to the white panel. Added 2 buttons w/twine knotted through and the sentiment is on the inside. Quick card--but fun! :)

Hope you guys can play along, too!
Pat

Sunday, September 4, 2011

Lawnscaping Challenge #17 and Sweet Sunday Sketch Challenge 133

Hello again!

There's nothing more fun than a day of creating cards! Having the day off from laundry and cooking and cleaning...and knowing that I can still play a bit tomorrow, too! Yay! And tonight I lucked out w/a great sketch and my favorite technique in 2 challenges. The card was fun and simple to make! Quick and easy are definitely my style!

So, here are the details to the different challenges: SSSC had a sketch to work off of and you can click here to play and here's the sketch.


Over on the Lawnscaping website, the challenge was to do a card using the embossing technique--dry or heat. You can play along here and here's the details to that challenge.


So, without further ado, here's the card I created for both of these challenges.
I knew I wanted to use a snowman and I knew the cuttlebug embossing folder w/snowflakes would be a perfect combo for it. I quickly embossed the blue cardstock and then sponged some white pigment ink over the whole card. I wanted it to look like it was a bit snowy in the back so I wasn't too particular over how the sponging looked. Then, I stamped my Stampin' Up Snowman in black soot distress ink and punched him out. I then colored in the image w/my glaze pens--including the eyes and the arms. I had a friend lend me a small snowflake punch a few months ago and I punched some extras. Using those extras, I created the border for the card. The top 3 snowflakes also have some diamond stickles on them--just hard to see in the pic. Using the orange glaze pen, I added some dots along the border of the circle punch and then mounted the image w/dimensional adhesive. Using an EK Success border punch, I punched out a strip of cardstock for the handwritten sentiment and used the black glaze pen for "Merry Christmas" and the card was done! EASY!!!! :)

Come play along...Embossing is so much fun and the sketch is great, too!

Happy Labor Day!

MOJO 206

Hi all!

I finally had a chance to play in my room today...and I'm just barely making the deadline for the mojo monday sketch this week. Here it is:


Here's my card:


I decided to go w/a square card. I've been enjoying that size...I grabbed some pattern paper from the KI Memories Designer Paper Pad and chose some teal-colored cardstock to go along w/it. I knew it would be a "happy b-day" card since that's what I'm always needing! So, I embossed the teal colored panel w/my cuttlebug swiss dots folder and then took my sentiment and stamped that several times on the white cardstock panel in vintage photo distress ink. Then, after adhering the panels, I added some brown ribbon. I then stamped an image of 2 b-day gifts (also from the same set of $1 bin stamps that the sentiment came in) and stamped it in distress china distress ink. I cut that out, added a couple of small pearls, and then mounted it w/dimensional adhesive. Finally, I added some pearls at the top right corner of the white panel and the card was done. After it was all done, though, I realized I could've added some distress ink along the edges of the panels to make them stand out a bit more but such is life. I liked this sketch--it's versatile for a lot of things...I can see myself using it often! :)

Like I said, I got a chance to play today so I'll be back later to post another card for another challenge. Hope everyone is enjoying the long weekend!

Pat

Tuesday, August 23, 2011

Lily Pad's The Greeting Farm Challenge

Hi all!

So, here's my final card for the day...maybe the week depending on how busy I get! I decided to play along w/the sketch found over on the Lily Pad website. You can find them here. Since I'm a big fan of sketches, I thought this one would be right up my alley.

Here's the sketch:


Here's my take on it:

I started out using my cuttlebug to emboss the front of the card w/the swiss dots folder. Then, I used some dark purple cardstock and, again using my cuttlebug, cut out the center panel. I stamped the image w/white pigment ink. It's from Delta and it's called Solidaga Sprig. I bought it a long time ago when it was on clearance at Michaels. To get several images, I simply repeated the stamping w/out reinking. Not sure I LOVE the look, but it's ok. Then, I took some orange ribbon and adhered it to the front of the card. Using dimensional adhesive, I placed the center panel. Then, using an EK Success punch (I think?), I cut out some photo corners in the purple. Done! :)

Thanks for stopping by!

Thursday, August 18, 2011

CPS 231

Hi again!

I guess when everyone goes to bed early except me, I get to enjoy some cardmaking time! :) This time, I knew I needed to make a card for a very special friend. I decided I'd go w/the sketch from Card Positioning Systems. Here's the sketch:


This is my take on it:


I, again, used the paper from KI Memories called Funky Paper Pad II. Then, I added some brown cardstock and used my white gel pen to add some faux stitching. Then, I used my cuttlebug to make the center panel. I knew I wanted the image of the houses so I grabbed my fiskars stamp (not sure the name of the set) and stamped that on cardstock. I added in some red coloring w/a slick writer pen. Actually, I had used a glaze pen but didn't like the color and that's why I grabbed the Slick Writer pen. I cut a couple of the houses out to add some dimension to the "neighborhood". Then, I thought I needed some more details so I added the cloud. For the sentiment, I matted it on brown cardstock and punched the edge of it w/an EK Success Punch. The actual sentiment is from the $1 bin. Can't beat that! :)

Since my friend is leaving home for the first time, I thought this card would be the perfect way to remind her we're here thinking of her.

Thanks for stopping by!


Wednesday, August 17, 2011

MOJO 204

Hi all!

Well, I finally sat down and tried my hand at the MOJO sketch for the week. Unfortunately, the card is for a dear friend who has lost a loved one. So, I guess the motivation was high to get the card done and in the mail for her. Can't wait for heaven! No more tears or sorrow!

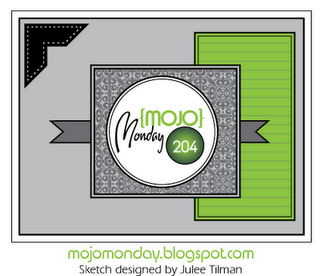
This was the sketch for the week:

Here's my take on the sketch:

Once I picked out the pattern paper, everything else fell into place for me. The pattern paper is from KI Memories and it's called the Funky Paper Pad II. I then cut a square of textured brown cardstock and mounted that one a white mat. Then, I cut a rectangular piece of the teal colored cardstock and embossed it w/my cuttlebug using the swirls (?) folder. Then I, again, used my cuttlebug to cut out the center panel. LOVE my cuttlebug! Once the paper was all in place, I punched a butterfly out of the teal colored cardstock using a Martha Stewart punch. LOVE this punch! I added some pearls to the butterfly and to the upper left edge of the card. Then took my brown marker and faked some antennae for the butterfly. The sentiment is stamped in pigment ink and is from Hero Arts (C1476).

Thanks for stopping by. If you want to play along, click here.

Sunday, August 14, 2011

Love is in the air!

Hi all!

I've been MIA for a bit b/c I was vacationing with family. We headed south to California for my cousin's wedding. We decided it would also be the perfect excuse to take the boys to Lego Land since it was my youngest son's 7th b-day yesterday. Talk about an exhausting 2 days of walking at Lego Land! Yet, as my hubby and I walked slowly back to the car as Lego Land was closing, our youngest RAN all the way and was so thrilled! Made the expensive entrance fee totally worth it! :)

But back to the wedding...I've always been a bit intimidated by wedding cards. I always think they have to be super fancy. But, I really wanted to give my cousin and his bride a handmade card. So, I got my nerve up and this is what I came up with.


The patterned paper was from the Luxury Stack (one of my favorites!). I then used my cuttlebug to cut the center label and emboss it around the edges. Love that look! Then, using some dollar stamps from my local craft store (The Craft Warehouse), I stamped "Love, honor, and cherish" on the label in a soft pink color. Using the wedding cake from the same $1 set, I stamped it in pink, cut it out, added some rhinestones, and put some glossy accents on the hearts. Now that I've had more time to look at the cake, I could've added some nice embossing to the cake, too. Oh well--time wasn't on my side on this one! Then I made the banner w/the sentiment (also from the $1 set) and the card was done. I learned how to score the paper to make the banner from either Jill Foster or Jennifer McGuire--my 2 favorite crafters! :)

Hope everyone is enjoying a fun Sunday! I still have unpacking, laundry, and cooking to do...sigh... :)
Thanks for stopping by!

Monday, August 1, 2011

MOJO 202 and Lawnscaping Challenge!

OK,

I know I've posted quite a bit these last 2 days but we're off to vacation for awhile and not sure when I'll get a chance to post again...SO, might as well play a bit before we leave! :)

Every Monday is the new MOJO sketch and this week's was a fun one! You can find the sketch here:

But I also loved the challenge on Lawnscaping so I thought I'd use the same card for that challenge, too. It's all about distressing on that challenge and you can find the details here:

So, here's my card:


I started out w/some bright orange cardstock that was a bit too bright for the patterned paper. So, I took some vintage photo distress ink and inked it up to tone it down some. Then, using a scrap from DCWV's Stack 6, I laid the main panel down. Then I took my white pen and added faux stitching all around the card. Then, I took my small Fiskars (I think?) butterfly punch and punched out 3 tiny butterflies in a nice maroon color. Decided to add a bit of bling to them w/some light green jewels and then added a few more jewels on the to border of the main panel. Then, I used one of my labels from Sizzix to rest the main butterfly on. I cut it out w/my cuttlebug and used a light blue gelato to watercolor the label. I wanted it a bit darker, though, so I used some Chipped Saphire Distress Ink and inked up the edges of the label. Then, I grabbed my favorite Martha Stewart butterfly punch and adhered that butterfly to the label. I added some antennae to the butterfly w/a black glaze pen and then some pearls to make it stand out even more. The "Happy Birthday" sentiment was from the dollar bin at the Craft Warehouse store. And it was done...I was surprised at how quickly I dreamed it up! :)

Now off to get ready for the vacation...packing...ugh!

Hope everyone's having a great day and thanks for stopping by!